
Maintaining a healthy and lush lawn requires a functional irrigation system, and a key component of that system is the sprinkler head. When a sprinkler head is broken, it’s essential to replace it promptly to prevent water waste and ensure even irrigation. In this article, we’ll walk you through how to replace a sprinkler head: a step-by-step guide, covering everything from identifying a broken head to troubleshooting after installation.
How to identify a broken sprinkler head?
Before you can fix a problem, you need to properly diagnose it. A broken sprinkler head can manifest through various signs, such as uneven watering patterns or visible leaks. You may also observe that parts of your lawn are not receiving enough water, resulting in dry patches, or that water is spurting irregularly from the sprinkler head.
Inspect your sprinkler heads regularly to catch any issues early on. Look for cracks, breaks, and any obstructions that could impede water flow. Taking the time to assess your irrigation system can save you from more significant troubles down the road.
Once you’ve confirmed that a sprinkler head is indeed broken, it’s time to gather your tools and get to work on the replacement process, ensuring your lawn remains in top condition.
What tools do you need to replace a sprinkler head?
Replacing a sprinkler head is a relatively straightforward task, but having the right tools on hand is crucial. The common tools for sprinkler head replacement include:
- A trowel or shovel for digging around the sprinkler head
- An adjustable wrench or socket set for unscrewing the head
- Plumber’s tape or seal tape to secure the new head
- A bucket or container to clean out any debris from the line
Having these tools ready before you start will facilitate a smooth and efficient replacement process.

 How to adjust sprinkler heads: top tips for success
How do you remove a sprinkler head without tools?
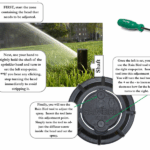
Sometimes you might find yourself needing to replace a sprinkler head but without the standard tools at hand. In such cases, you can still remove the head with a bit of ingenuity. First, carefully dig around the head with your hands or a small garden tool to expose it. Grasp the body of the sprinkler head firmly and twist it counterclockwise. If the head is not too tight and you have a strong grip, you may be able to unscrew it without additional tools.
Remember, while this method can work in a pinch, it’s not the recommended approach as it can lead to further damage or an inability to properly secure the new head. Whenever possible, use the appropriate tools to ensure the job is done right.
What are the steps to replace a sprinkler head?
When it comes to how to replace a sprinkler head: a step-by-step guide, the process can be broken down into several key steps:
- Turn off the water supply to your irrigation system to prevent any accidents.
- Use a trowel to dig a circle around the sprinkler head, giving yourself ample room to work without damaging the pipes.
- Unscrew the broken sprinkler head from the riser using a wrench or by hand if possible.
- Flush out the line by briefly turning on the water to remove any debris that may have settled in the pipe.
- Wrap plumber’s tape around the threads of the new sprinkler head to ensure a watertight seal.
- Screw the new head onto the riser, hand-tightening it to avoid over-tightening and damaging the threads.
- Adjust the spray pattern of the new head as needed to cover the desired area.
- Turn the water back on and check for any leaks or misalignment. Make any necessary adjustments.
- Backfill the soil around the sprinkler head and tamp it down gently.
Following these steps will help you replace your sprinkler head efficiently and with confidence.

How to raise a sprinkler head effectively?
Raising a sprinkler head might be necessary if it’s too low in the ground, leading to poor coverage and possible damage from lawn mowers. To raise a sprinkler head, you’ll need to:
 Fiddle leaf fig propagation: get more plants for free with our tips
- Turn off the water to your irrigation system.
- Excavate around the existing sprinkler head to expose the riser.
- Unscrew the head and the riser from the fitting below.
- Add a riser extension or replace the existing riser with a longer one to achieve the desired height.
- Reattach the sprinkler head to the new riser and adjust the height as necessary.
- Test the system to ensure the raised head provides adequate coverage.
- Backfill the soil and secure the area around the raised sprinkler head.
By following these steps, you can effectively raise a sprinkler head for better irrigation coverage.
What are common problems with sprinkler heads?
Sprinkler heads can encounter several issues that affect their performance and the health of your lawn. Some common problems with sprinkler heads include clogging due to dirt and debris, physical damage from lawn equipment, wear and tear over time, and improper alignment leading to ineffective watering patterns.
To prevent these issues, regular sprinkler maintenance is essential. Inspect your sprinkler heads frequently, clean them regularly, and adjust them as needed to ensure they are providing optimal coverage. If you encounter persistent problems or notice a drop in performance, it may be time to replace the affected sprinkler heads.
Related Questions on Sprinkler Head Replacement
How do you change your sprinkler head?
To change your sprinkler head, you need to first identify the broken head, turn off the water supply, dig around the head, remove it, and then install a new one that matches the specifications of your system. Don’t forget to check for proper alignment and test for any leaks after installation.

Do you have to shut off water to replace a sprinkler head?
Yes, it is crucial to shut off the water before attempting to replace a sprinkler head. This prevents water from gushing out and causing a mess or potential injury while you’re working.
What is the 3x rule for sprinklers?
The 3x rule for sprinklers is a guideline suggesting that the sprinkler heads should be placed so that each sprinkler’s water reach extends to the adjacent head, effectively creating an overlap of coverage that ensures the entire lawn is watered evenly.
 How to remove a tree stump: follow our practical guide
Can you replace a sprinkler head without digging?
While it’s possible to unscrew a sprinkler head without digging, you will typically need to dig around the head to properly install a new one to ensure it sits at the correct height and aligns properly with your lawn’s surface.
Replacing a broken sprinkler head is a manageable DIY task that can save you time and money while keeping your lawn green and thriving. With the right tools, a clear understanding of the process, and regular maintenance, your irrigation system will serve you well for years to come.